
React Next.js Podcast Search – Demo
This is a single page server side rendered app which uses Alan AI to enable voice commands to search podcastsindex.org for relative podcasts.
Description
This AI ssr app was created with react framework Next.js bootstrapped with create-next-app. This AI app is hosted for free on Netlify (cloud computing platform). The podcast data is sourced through podcastsindex.org.
You can learn this
- Create a server side rendered project with create-next-app.
- Create an Alan Studio account and make a new project.
- Initialize the Alan button to except voice commands.
- Create an account at podcastindex.org generate an api key and secret.
- In alan ai account create a command that sends a request to search podcastindex.org.
- List and style podcast data in ui.
- Deploy to Netlify.
Software used for this application
- Visual Studio Code (version 1.38.1)
- Git 2.15.2
- Node.js (version 14.4.0)
- NPM (version 7.10.0)
- Alan AI Set up a free account
- PodcastIndex API Set up a free account
- @alan-ai/alan-sdk-web 1.8.25
- classnames 2.2.6
- next 10.1.3
- react 17.0.1
- react-dom 17.0.1
- words-to-numbers 1.5.1
- Netlify
- iterm2 (version 3.3.12)
- creat-next-app
- GitHub
Initialize an app with create-next-app.
NPM and node.js must be installed globally and are required in order to follow along with this tutorial. I upgraded the global version of node.js to 14.4 for this app to work properly.
Open the terminal then type cd desktop and then type the command npx create-next-app. Then you will be prompted to give a name to your project. The project folder will be on your desktop, open the project with Visual Studio Code (free code editor).
Sign up for an account at Alan Studio.
I am using The Alan Studio API to implement voice commands in this app. I signed up at https://studio.alan.app/register and clicked sign up with GitHub. You can also create an account with your email. You will get 50 free interactions (API requests) after the account is created.
Create a new project and get alan ai api key.
Sign in to your Alan Studio account and navigate to the projects home page. To find the projects page click on the Alan Studio logo on the left side of the navigation bar at the top of the page or navigate to https://studio.alan.app/projects. Create a new project by clicking on the Create Voice Assistant button located on the right side of the navbar. Click on the Empty project selection and then you will be prompted to name the project. Once you create the empty project you get redirected into the project dashboard where you can find the project’s API key. On the right side the of the navbar click the the </> Integrations button and you’ll find the Alan SDK Key (API key) at the top heading of the page. Now you will copy the key and paste it into the next.js app. Go to project-name/pages/index.js and paste the key at the top of the file const alanKey = 'your-key-here'.
Set up voice commands.
This app requires some third party packages for the AI voice commands to work properly. In the terminal cd into the project then type npm i @alan/ai classnames words-to-numbers --save. The @alan-ai/alan-sdk-web package is going to allow a microphone button icon to appear in the bottom right of the ui. The alan apiKey will initialize the microphone button. I imported useEffect from react to make a request to the alan API.
To serve the app using the terminal cd into the app and type npm run dev from the root of the app then in the browser (chrome) go to http://localhost:3000, and the microphone icon will appear at the bottom right of the page. The create-next-app team is kind enough to provide a nice home page with styles, I had to make a few adjustments to make my homepage for this app.
We can test our voice command by going to the Alan studio dashboard project page and add this line intent('What is this?', reply('This is a react AI project.'));. Click the microphone icon button and say “What is this?” and you will hear a voice say “This is a react AI project.”.
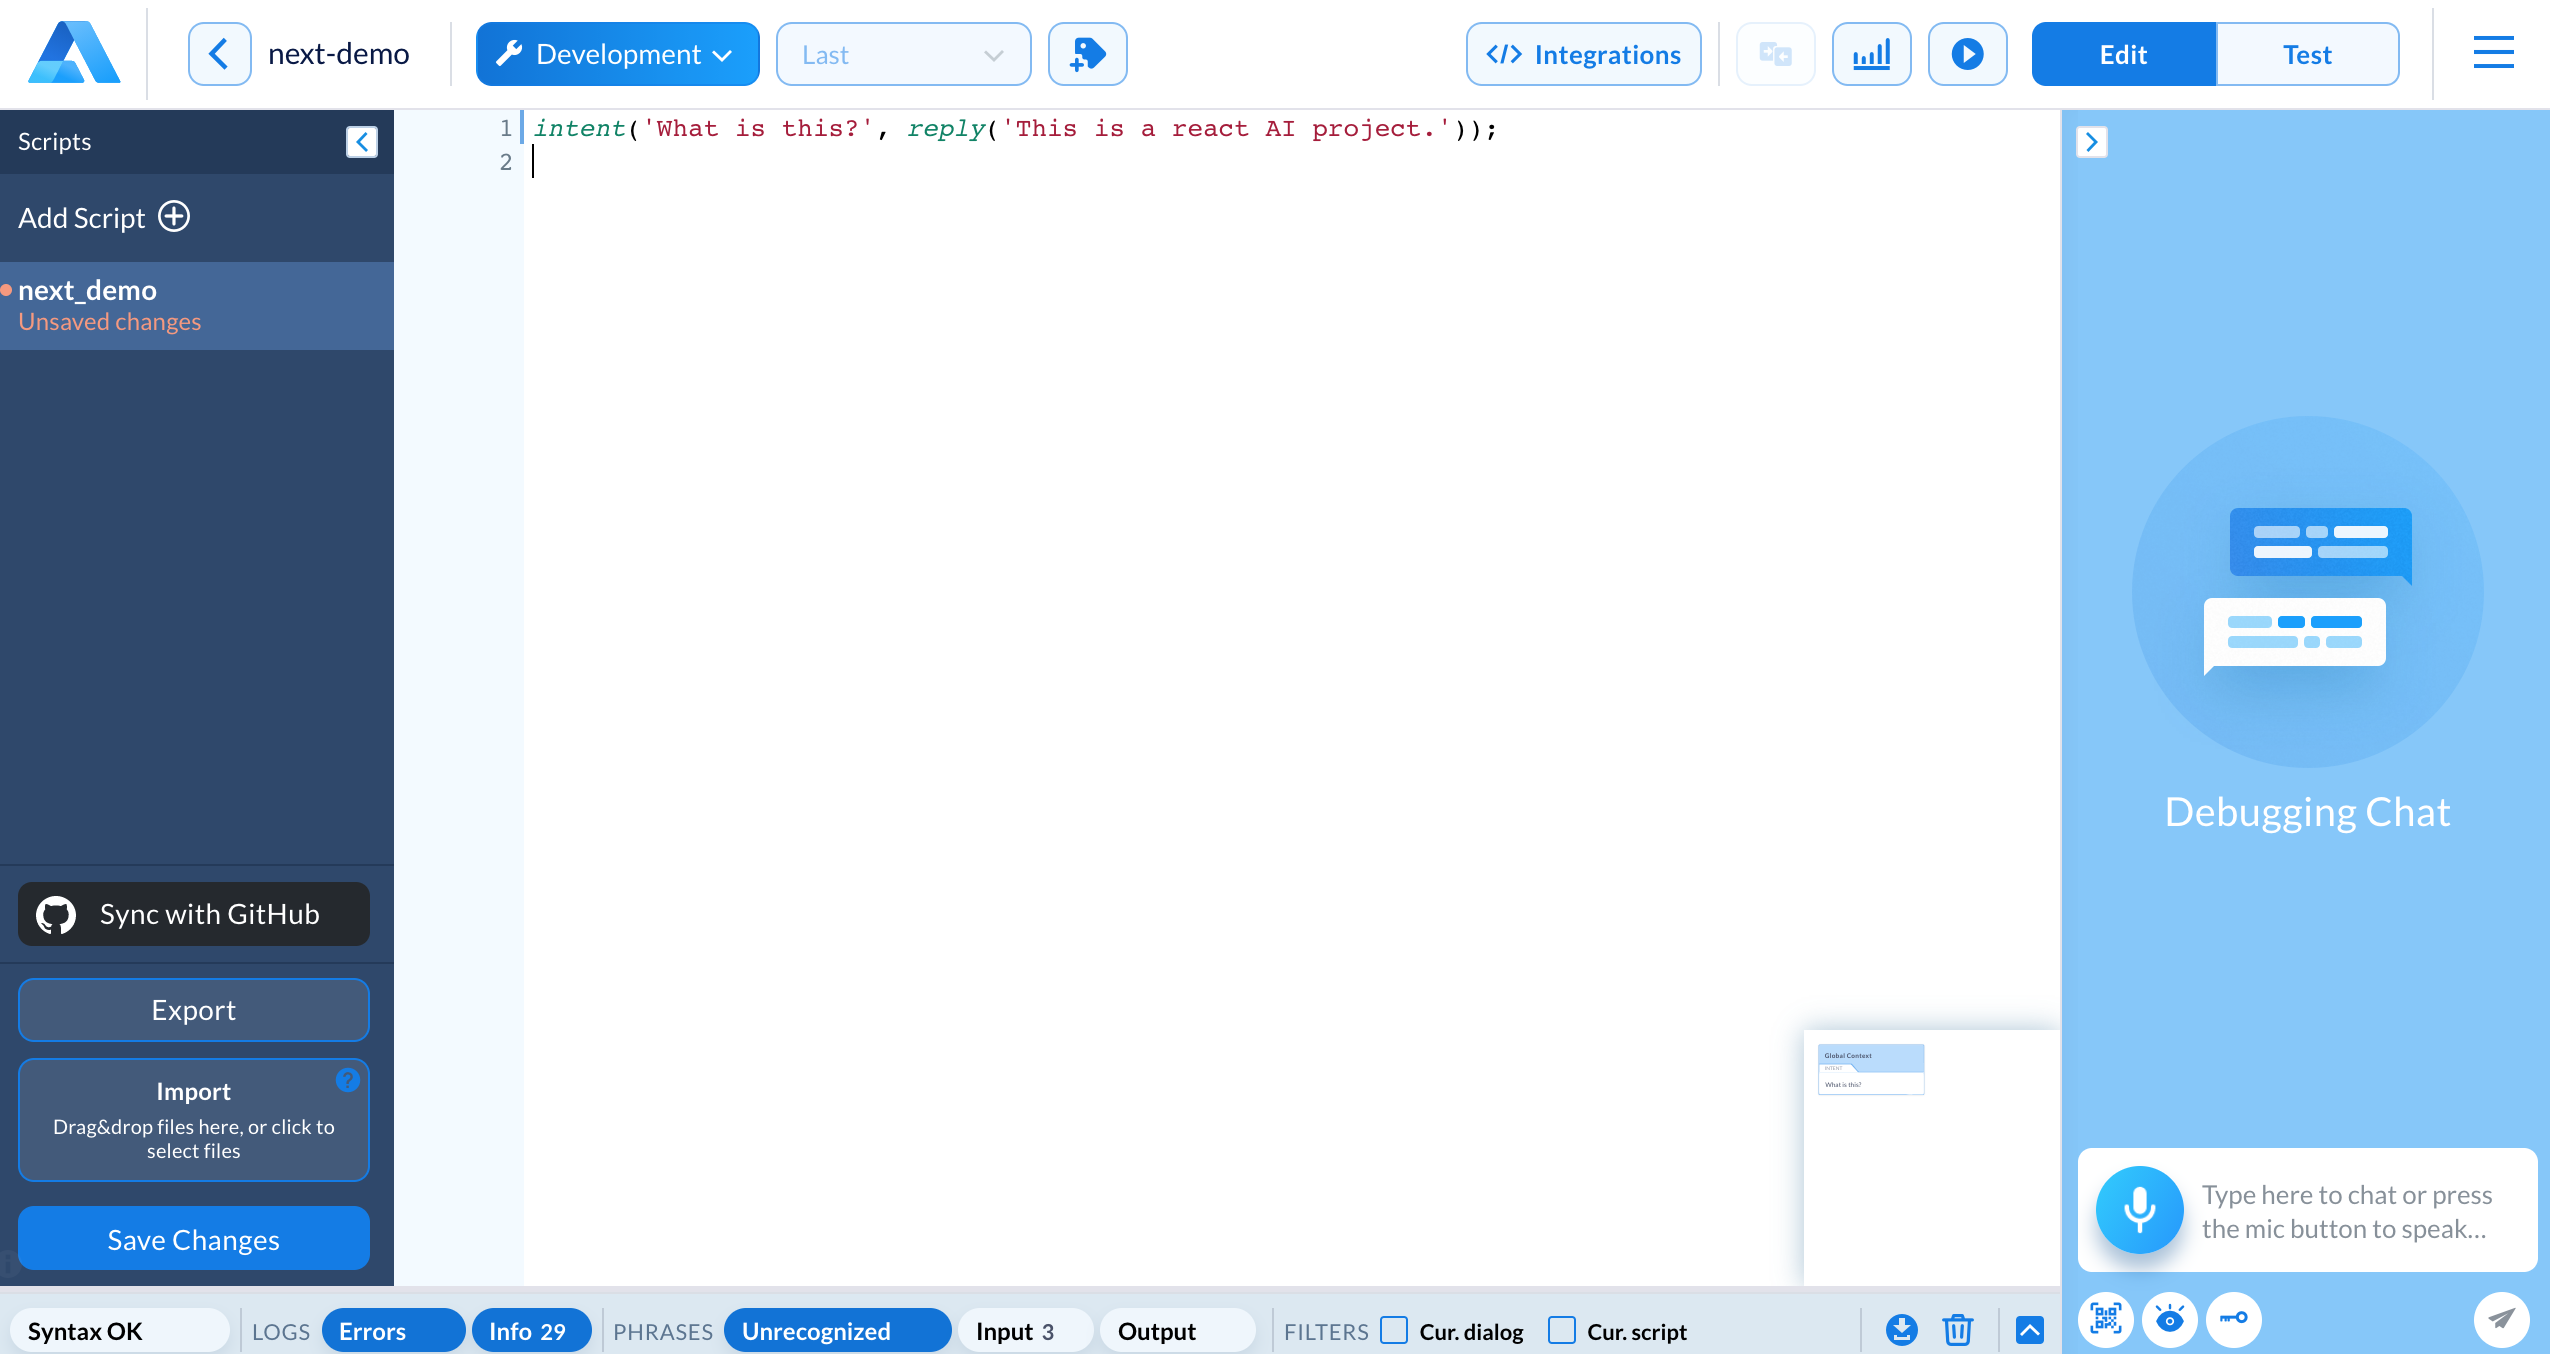
Update the pages/index.js file with the code below to establish a basic home page.
//pages/index.js

import Head from 'next/head'
import styles from '../styles/Home.module.css'
import { useEffect } from 'react'
const alanKey = 'your-key-here'

export default function Home() {

  useEffect(() => {
    const alanBtn = require('@alan-ai/alan-sdk-web');
    alanBtn({
      key: alanKey,
      onCommand: () => {}
    })
  }, [])

  return (
    <div className={styles.container}>
      <Head>
        <title>Title</title>
        <link rel="icon" href="/favicon.ico" />
      </Head>

      <main className={styles.main}>
        <h1 className={styles.title}>
          Title
        </h1>

        <p className={styles.description}>
          description
        </p>

        <div className={styles.grid}>
          content...

        </div>
      </main>

      <footer className={styles.footer}>
        Created by Ian Poston 2021
      </footer>
    </div>
  )
}
Create account at podcastindex.org
I created a free account at podcastindex.org to enable the ability to make a search request for podcasts. To authenticate the search request I needed to generate an api key and secret. I signed up by going to https://api.podcastindex.org/signup. After I completed the sign up the api key and secret were emailed to me.
In this example I am searching for podcasts by a search term. For example if I say “give me podcasts by NPR” the api request to get results is 'https://api.podcastindex.org/api/1.0/search/byterm?q=NPR'. For more api requests info for podcastindex go to https://podcastindex-org.github.io/docs-api/#get-/search/byterm.
Create a command that sends an API request.
I added the api request, the api key, and secret to the alan studio project.
//alan studio project

intent('What is this?', reply('This is a react AI project.'));

const API_KEY = 'PodcastIndex apiKey';
const SECRET = 'PodcastIndex secret';

//Podcasts by source
intent('Give me podcasts from $(source* (.+))', (p) => {
   let PODCAST_API_URL = 'https://api.podcastindex.org/api/1.0/search/byterm?q='

   if(p.source.value) {
      PODCAST_API_URL = `${PODCAST_API_URL}${p.source.value.toLowerCase().split(" ").join('-')}`
      p.play({url: PODCAST_API_URL, key: API_KEY, secret: SECRET})
   }
});
The AI will detect the word said after “from” in your voice request. Then I concatenate that word to the api endpoint. Then using p.play({url: PODCAST_API_URL, key: API_KEY, secret: SECRET}) I am passing everything I need to authenticate my request in the app.
List podcast data in ui.
Using node-fetch I build a request in my app. When the payload from the api is sent back in a response I will use useState from react to set the items in an array to be repeated and rendered in the ui.
Outside of the useEffect scope I define useState with this line const [items, setItems] = useState([]). Inside the the fetch api request I use setItems to initialize the data from the api response with this line setItems(data['feeds']). Once the data is set in useState I can use a js for loop on the variable items and show each item from the array in the ui. In the ui I want to show the item.title, use the podcast item.link, and show the podcast item.image. If the item.image is empty I use a ternary condition to use a static image located in the public folder instead. A json example of podcast data.
For this project I am not using the separate component architecture but rather I decided to keep it simple by putting all the ui code in pages/index.js. Full pages/index.js file for this Podcast Search App.
When I created this next.js app it came with some nice css styles that I re-used for this project, I simply made a few tweaks to make it look well enough for this project. Full CSS file for this Podcast Search App.
Deploy to Netlify.
To follow along with this part of the tutorial requires a GitHub account. The app needs to be pushed to a new repository but before committing the app make sure to remove the alan API key from pages/index.js. On line 6 of pages/index.js add this line const alanKey = process.env.NEXT_PUBLIC_KEY. The apiKey will be added securely to Netlify config settings after we deploy the app, which I’ll explain how to do below. Don’t expose private keys to Github.
I decided to deploy this app to Netlify because it’s free and I’ve been wanting to use this service for a while considering that I’ve heard so many good things about the platform.
After pushing this app to GitHub I go to https://www.netlify.com/ and click sign up. From the signup page, I use my GitHub account to sign up. I will deploy this app straight from the GitHub repo so I will need to authorize Netlify to have read access to the repository that I pushed the code to.
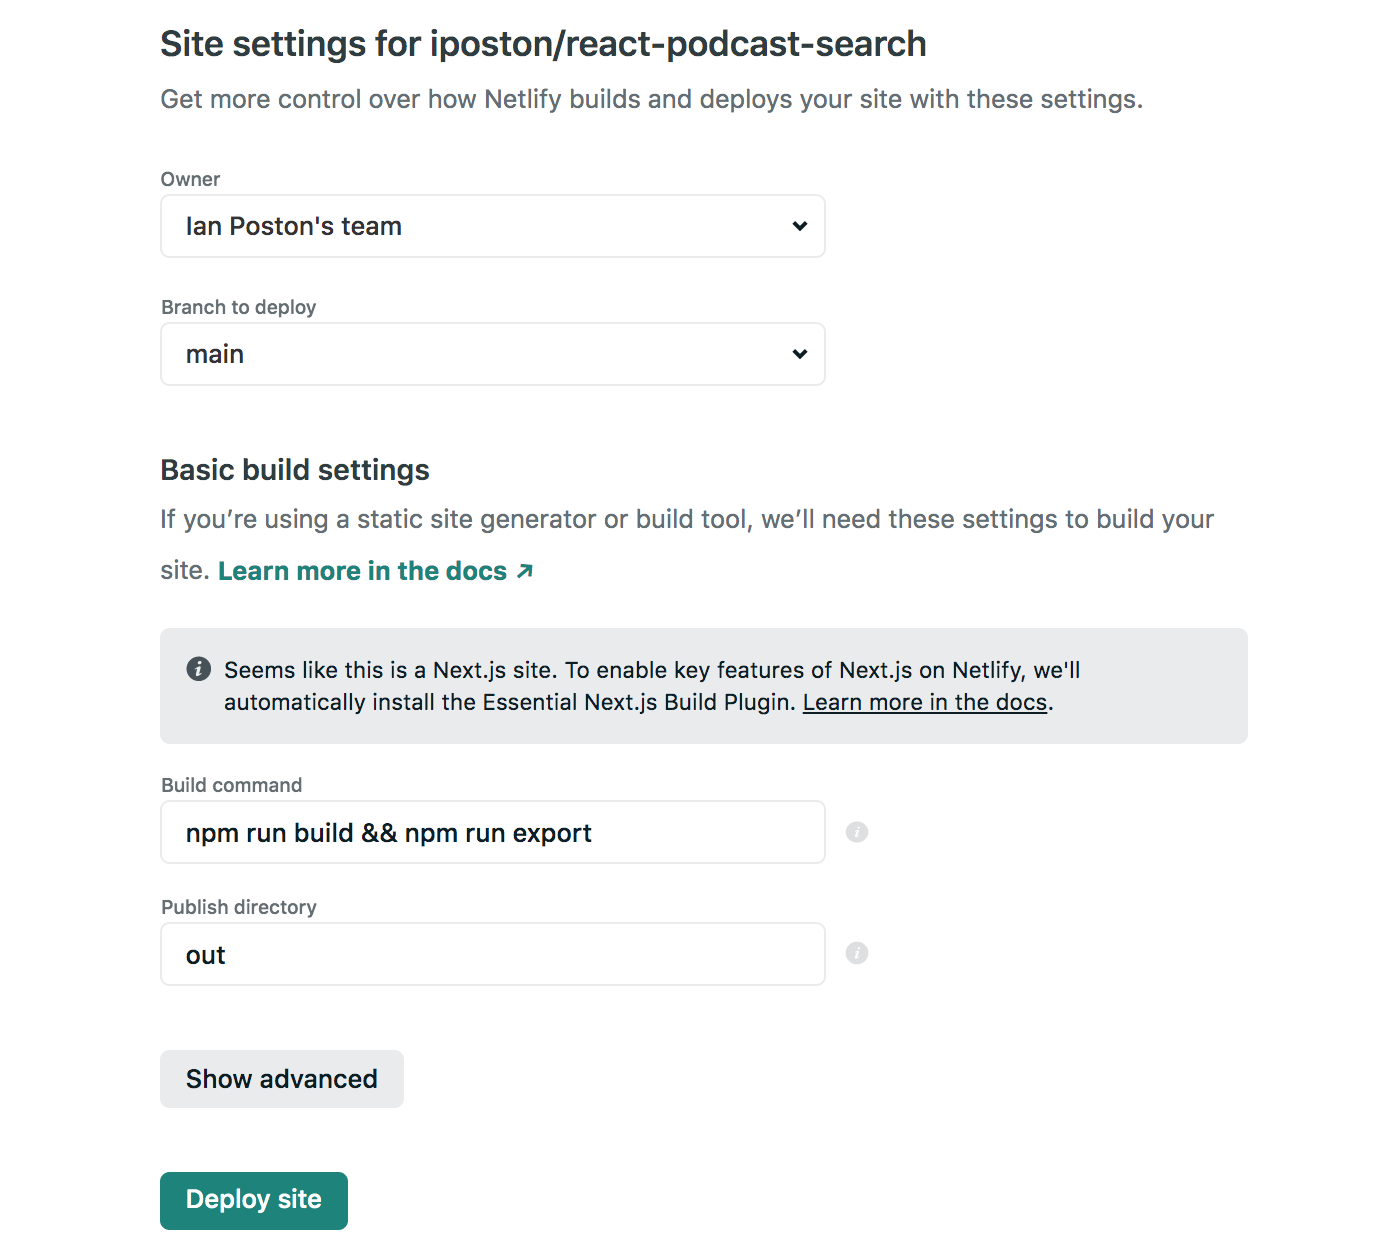
Before I deploy this app I need to add this build command "export": "next export" to the package.json file on line 9 inside the scripts: attribute. And I add a netlify.toml file to the root of the app with these two lines added to it command = "npm run build && npm run export" publish = "out".
To get started with the Netlify deploy sign in and go to https://app.netlify.com/start. There is a 3 step process to deploy.
1. Connect to git provider, in this example I clicked GitHub.
2. Pick Repository, click the name of the repo that has the code.
3. Site settings and deploy. There are 4 settings to consider before deploy. The owner name will be auto-filled with the team name that was used when the Netlify account was set up and the second setting is the branch name that I deployed from which will be main. Through some trial and error and with some helpful comments from Netlify users I had to add this build command to the settings npm run build && npm run export and the last setting type out for the Publish directory. Then click the Deploy site button.
After deploying to Netlify from the top of the page navigation menu click Site Overview then just below click the Site settings button. On the left side there is a vertical menu click Build & deploy option then click Environment option from the same menu and click edit variables button and add key: NEXT_PUBLIC_KEY value: your alan apiKey and click Save. Go to the site URL and you’re all good to test your app. Each time there is a push of changes to the main branch of your repository Netlify will deploy automatically. Thank you for reading!
The Full source code for this app.
References
- https://javascript.plainenglish.io/getting-started-with-react-server-side-rendering-using-next-js-ba9ed691fa85
- Build and Deploy a Voice Assistant App | Alan AI, React JS
New Features
Plans for a part 2 tutorial: Learn to build a media player for playing a podcast, add more voice commands to select search options by number, and add manual search input.
